Welcome to our online store
Latest Products Get our latest products by subscribing this site

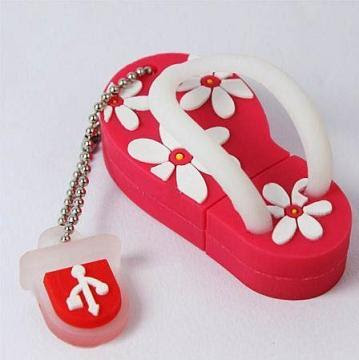
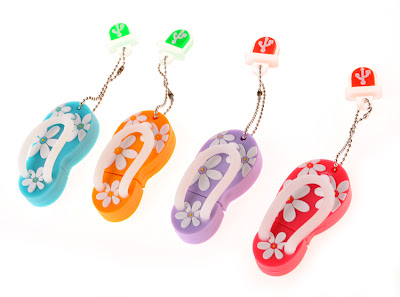
Pendrive Berbentuk Selipar Pantai - 4 Warna

RM20.60

   Harga : RM30.00 RM20.60 sahaja
   Anda Jimat : RM9.40

   Interface : USB 2.0

   Penyimpanan Data : Sekurang-kurangnya 10 tahun
   Kebolehan Memadam : >10,000 kali
   Standard : Sambung dan pasang (plug and play)
   Bekalan kuasa DC 5V±10%, Max current: 200 mA
   Tahap suhu : Masa beroperasi : 0°C-70°C, masa tidak beroperasi : -20°C- -75°C

   Harga :


 Kapasiti
Harga Seunit 
 <= 1GB
RM20.60
 2GB
RM25.50
 4GB
RM30.20 
 8GB
 RM37.20
 16GB
 RM54.20
 32GB
RM96.50 
 64GB
RM181.70 

   Warna :


Gambar Lain :
BIRU
MERAH


UNGU
ORANGE
4 PILIHAN WARNA


Happy Eyeball

Credit To : funandfang
Materials
Yarn in black, white and blue (or green or brown, depending on the eyecolor you want to use)
Filling
Emboidery floss in red and black
Safety eyes
Abbrevviations
St - stitch
sl st - slip stitch
ch - chain
sc - single crochet
inc - increase
dec - decrease
*- repeat between * and *
Notes
* work in continuous rounds
*filling, I always use the inside from old cushions. It´s cheap and works great
*Important: if you make this toy for a child under the age of 4, embroider the eyes!

Eyeball
With white
(top)
R1: sc 6 in magic ring
R2: inc around (12)
R3: *sc 1, inc* repeat around (18)
R4: *sc 2, inc* repeat around (24)
R5: *sc 3, inc* repeat around (30)
R6: *sc 4, inc* repeat around (36)
R7: *sc 5, inc* repeat around (42)
R8: *sc 6, inc* repeat around (48)
R9-11: sc 48
R12: *sc 6, dec* repeat around (42)
R13: *sc 5, dec* repeat around (36)
R14: *sc 4, dec* repeat around (30)
R15: *sc 3, dec* repeat around (24)
R16: *sc 2, dec* repeat around (18)
Stuff eyeball and secure safety eyes
R17: *sc, dec* repeat around (12)
R18: dec around (6)
(bottom)
Fasten off, weave in loose ends
Glue on eyes, if you haven´t used safety eyes and embroider mouth at the top of the eyeball.
Embroider veins at the bottom of the eyeball.
Middle of the eye
With black
R1: sc 6 in magic ring
R2: inc. around (12)
R3: *sc, inc* repeat around (18)
With blue (brown of green)
R4: *sc 2, inc* repeat around (24)
R5: *sc 3, inc* repeat around (30)
Fasten off, weave in loose ends, secure to eyeball, on top of the veins.
Now secure a ribbon to finish your halloween decorationa

Halloween Spider and Web

OnMirror2SpiderFront
Credit to : YanaKnits

This project is a cross between crocheting and knitting (and construction, if you count using wire).  The spider’s body is crocheted and the legs are knitted – knitted I-cords for legs were a lot easier to make and looked a lot better than any skinny crocheted tubes I tried to create. Why not use both techniques, I thought, if in the end you end up with a better design.
Yarn, Needles and Crochet
I still had a few skeins of black Plymouth Bella Colour Yarn left after making the soccer ball and the sheep. The spider took about 1/2 of the skein. The web was made out of the yarn leftover from making a sweater about 5 years ago.
  • Crochet size 6/4.0 mm (G) (both for the spider and the web)
  • 2 double-pointed needles US size 3 for spider’s legs
  • 1/2 skein of black Plymouth Bella Colour yarn for the spider
  • 1/8 skein of off-white Caron One Pound yarn for the web (or any acrylic worsted weight yarn)
Spider
SpiderFront
The spider’s body is made in one piece. The legs are knitted as I-cords and attached to the bottom of the spider.
Spider’s Body
Chain 3, join with a slip stitch
  • Round 1 (increase 3): SCx2 into every stitch (=6 st total)
  • Round 2 (increase 6): SCx2 into every stitch (=12 st total)
  • Round 3 (increase 6): SCx2 into every other stitch (=18 st total)
  • Round 4 (increase 3): [SC5, SCx2 into the next stitch] 3 times (=21 st total)
  • Rounds 5-8: SC all stitches
  • Round 9 (reduce 3): [SC6, skip 1] 3 times (=18 st total)
  • Round 10 (reduce 5): skip 1, [SC3, skip 1] 4 times, SC1 (=13 st total)
Stuff the head with fiberfill
  • Round 11 (reduce 5): [skip 1, SC2] 4 times, skip 1 (=8 st total)
  • Round 12: SC all stitches
  • Round 13 (increase 8): SCx2 into every stitch (=16 st total)
  • Round 14 (increase 4): [SC3, SCx2 into the next stitch] 4 times (=20 st total)
  • Round 15: SC all stitches
  • Round 16 (increase 4): [SC4, SCx2 into the next stitch] 4 times (=24 st total)
  • Round 17 (increase 4): [SC5, SCx2 into the next stitch] 4 times (=28 st total)
  • Rounds 18-21: SC all stitches
  • Round 22 (reduce 4): [skip 1, SC6] 4 times (=24 st total)
  • Round 23: SC all stitches
  • Round 24 (reduce 6): [skip 1, SC3] 6 times (=18 st total)
  • Round 25 (reduce 6): [skip 1, SC2] 6 times (=12 st total)
  • Round 26 (reduce 6): [skip 1, SC1] 6 times (=6 st total)
Stuff the body with fiberfill
  • Round 24 (reduce 3): [skip 1, SC1] 3 times


Spider’s Legs
The legs are knitted as I-cords. Cast on 4 stitches using double-pointed needles and make 1 I-cord 12 inches long for the back legs, 2 I-cords 11 inches long for the middle legs, and 1 I-cord 10 inches long for the front legs. Insert flexible wire inside the I-cords and sew the ends closed. Sew the legs to the neck/belly of the spider’s body, then bend them to any shape you like.
SpiderBack_thumb

Instant Halloween Customs

Credit To : rylisse

Instant Halloween Costume
size F hook
plastic headband: 1/2" (5/8", 3/4") diameter
Note: 
dec = sc 2 together
inc = sc 2 in same space

Make headband cover for all costumes. All require 75-125 yards of MC yarn and Kitty, Bunny, and Arrow require 25-75 yards of CC yarn.

Headband Cover
Using MC, sc 5 (6, 7) in magic ring, pull tight.
Sc around 55 rounds or to necessary length to cover entire headband.
Slide headband into cover.
Weave end through last 5 sts, pull tight.

Kitty Costume
Ears
Make 4 total – 2 MC, 2 CC.
Ch 9, sc in 2nd stitch from hook. Sc across. Ch 1, turn. (8 sts)
rows 2-6: sc across. Ch 1, turn. (8sts)
rows 7-8: dec, sc to 2nd st to end, dec. ch 1, turn.
row 9: dec, dec. ch 1, turn.
row 10: dec.
Place finished CC ear on top of finished MC ear. Using MC, sc border around through both
layers. At top of ear, sc 3 in same stitch. Continue on with sc border.
Stitch ears onto headband. Weave in ends.

Bunny Costume
Ears
Make 4 total – 2 MC, 2 CC.
Ch 9, sc in 2nd stitch from hook. Sc across. Ch 1, turn. (8 sts)
rows 2-11: sc across. Ch 1, turn. (8sts)
rows 12-13: dec, sc to 2nd st to end, dec. ch 1, turn.
row 14: dec, dec. ch 1, turn.
row 15: dec.
Place finished CC ear on top of finished MC ear. Using MC, sc border around through both
layers. At top of ear, sc 3 in same stitch. Continue on with sc border.
Insert folded pipe cleaner if desired. Stitch ears onto headband. Weave in ends.
Stitch ears onto headband. Weave in ends.


Devil Costume
Horns
Make 2 total.
ch 14, slsts in 1st ch to join
rnds 1-4: sc around (14 sts)
rnds 5-8: slst 5, sc 9 around (14 sts)
rnd 9: dec around (7 sts)
rnd 10: dec, sc, dec, dec (4 sts)
Weave end through last 4 sts, pull tight. Stuff. Stitch onto headband, horns curved inward. Weave in all ends.


Arrow Through Head
Arrowhead & Shaft
Using CC, sc 5 in magic ring.
inc around (10 sts)
sc around 3 rounds (10 sts). Stuff lightly.
dec around (5 sts)
Using MC, sc around 12 rounds.
Insert pipe cleaner. Stitch shaft onto side of headband and weave in ends.
Arrow Shaft & Feathers
Using MC, sc 5 in magic ring, pull tight.
sc around for 15 rounds. Break yarn.
Using CC, slst onto 5th round.
*sc onto 4th round.
hdc onto 3rd round.
dc onto 2nd round.
trc onto 1st round.
ch 1, turn. sc across all CC sts made. slst onto 6th round. Break yarn.
Turn tail 1/4 and repeat from * a total of 4 times.
Insert pipe cleaner. Stitch shaft onto side of headband and weave in ends.

Halloween Treat Baskets

Credit To : stormyzcrochet

Materials Needed:
WW yarn, small amount in MC
and CC
Size F hook
Yarn needle

Finished Size: Approx 2 " high by 3" wide, not counting handle.

Note:The same pattern is used for all baskets shown in
picture.
These baskets can be easily customized as you wish using
different colors and embroidering faces as desired.


Pattern:
Row 1: Starting at bottom of basket with MC, ch 11,
sc in 2nd ch from hook and in each remaining ch across,
ch 1, turn. (10)

Row 2: Work 2 sc in 2nd ch from hook, sc in each remaining
sc to last sc, 2 sc in last sc, ch 1, turn. (12)

Rows 3 - 8: Sc in each sc across, ch 1, turn.

Row 9: Dec 1 sc over next 2 sc, sc in each remaining sc to last 2 sc,
dec 1 sc over last 2 sc, ch 1, turn. (10)

Row 10: sc across, ch1, DO NOT TURN.

Rnd 11: Working down side of bottom, work a sc in edge of each of next 9 rows,
work sc in each 10 chs of foundation row, work sc in edge of next 9 rows up
next side and sc in each sc of row 10, skipping the ch 1 of row 11, join in 1st sc
of rnd 11, ch 1, DO NOT TURN. (38 sc)

Rnd 12: Working in the back loops only of rnd 11, work a sc in each sc around,
join, ch1 , turn.

Rnd 13 - 18: Sc in each sc around, join, ch 1, turn.

Rnd 19: Sc in each sc around, changing to CC in last step of last sc, fasten off MC,
join, ch 1, turn.

Rnd 20: Sc in each sc around, join, fasten off.

Weave in loose ends.

Embroider face as desired.

Handle (can be made with either MC or CC)

Row 1: Leaving a tail for sewing, Ch 30, sc in 2nd ch from hook and in each remaining ch across, ch 1, turn. (29 sc)

Row 2: Sc in each sc across, leaving a length of yarn for sewing, fasten off.

Attach ends of handle to the inside each side of treat basket.

Done!!!

halloween_treat_basket.pdf

Halloween Goody Bag

Halloween Goody BagHalloween Goody Bag
Credit To : crochetmemories.com

Designed by: Cylinda Mathews


Materials:
Sm amt worsted weight yarn, (Black, White, Orange)
Crochet hook, size G


Finishing Materials:
Tapestry needle
No Sew Fabric Glue
Reg. glue
2 sm plastic eyes


Finished Size: 8" T x 5 1/2" W
Gauge: Not important to overall size

Skill Level: Beginner


Special Stitches:
Hdc Inc: (yo, insert hook in base of last st made, pull up a lp, yo, draw through 1 lp on hook (foundation inc made), yo, draw through last 3 lps on hook to complete the st) as many times as stated.

Dc Dec: (yo, insert hook in next st, pull up a lp, yo, draw through 2 lps on hook) as many times as indicated, yo, draw through all lps on hook to complete the st.
Bag: (Using black)
Rnd 1) Ch 20; (3 sc) in 2nd ch from hook, sc in next 17 ch, (3 sc) in last ch, working back up opposite side of foundation ch in free lps, sc in next 17 ch; join with a sl st in back lp of first sc: 40 sc.
Rnd 2) (Working in back lps only); ch 1, sc in joining; * sc in next sc; rep from * around; join with a sl st in first sc: 40 sc.
Rnd 3) (Working in both lps); ch 3 (counts as first dc); * dc in next sc; rep from * around; join with a sl st to first dc: 40 dc.
Rnds 4-13) Ch 3; * dc in next dc; rep from * around; join with a sl st to first dc: 40 dc.
Rnd 14) Eyelet rnd: ch 4 (counts as first dc, plus ch 4), sk next dc; * dc in next dc, ch 1, sk next dc; rep from * around; join with a sl st to 3rd ch of beg ch 4: 20 dc/20 ch 1-sps.
Rnd 15) Ch 3, dc in next sp; * dc in next dc, dc in next sp; rep from * around; join with a sl st to first dc: 40 dc. (Do not end off.)
Girl's Edging:
Rnd 16) Sk next dc, (5 dc) in next dc, sk next dc, sl st in next dc; * sk next dc, (5 dc) in next dc, sk next dc, sl st in next dc; rep from * around; join with a sl st in first st: 10 fans. Fasten off; secure ends.
Boy's Edging:
Rnd 16) Ch 1, sc in joining, working behind sc just worked, sc in last dc on last rnd; * sk next dc, sc in next dc, working behind last sc worked, sc in skipped st; rep from * around: 40 sc.
Boo Letters: (Using white)
Letter B:
Rnd 1) Ch 15, sl st in 4th ch from end, ch 8, sl st in first ch; ch 1, sc in same ch, sc in next 6 ch. Fasten off; secure ends.

Letter O: (Make 2)
Rnd 1) Ch 20; sl st in first ch to form a ring; sl st in next ch, sc in next 7 ch, sl st in next 2 ch. Fasten off; secure ends.

Ghost: (Using white)
Row 1) Head: ch 4; (12 dc) in 4th ch from hook (first 3 ch skipped counts as first dc); join with a sl st to first dc (4 th ch of beg ch 4): 13 dc.
Row 2) Arms: ch 6; hdc in 3rd ch from hook (first 2 ch skipped counts as first hdc), hdc in next 3 chs, (working across the head), hdc in next 3 dc, (hdc inc) 5 times see special sts.: 13 hdc.
Row 3) Body: ch 1, turn work; sl st in 5th st; ch 3 (counts as first dc), dc in same st, dc in next 3 hdc, (2 dc) in next hdc: 7 dc.
Row 4) Ch 2, turn work, dc in next dc (counts as beg dc dec), dc in next 3 dc, dc dec over last 2 dc see special sts. 5 dc.
Row 5) Ch 3, turn work; dc in next 4 dc: 5 dc.
Row 6) Ch 2, turn work, dc in next dc (counts as beg dc dec), dc in next dc, dc dec over last 2 dc: 3 dc.
Row 7) Ch 3, turn work; dc in next 2 dc: 3 dc.
Row 8) Ch 2, turn work; dc in next dc (counts as a beg dec): 1 dc.
Row 9) Tail: ch 10, (2 sc) in 2nd ch from hook, (2 sc in ch) 6 times, hdc in last 2 ch; join with a sl st in last dc on row 8. Fasten off; secure ends.
Ties: (Using orange)
Row 1) Ch 75. Fasten off; secure ends.
Finishing:
Glue the letters for BOO on front or back of bag as shown in photo using the No Sew Fabric Glue. Glue the ghost to the opposite side of bag as shown in photo. Glue plastic eyes to ghost face. Weave the ties through the eyelet rnd starting at center front. Tie ends into a bow.

 
Support : Creating Website | Johny Template | Mas Template
Copyright © 2011. Crochet For Halloween - All Rights Reserved
Template Created by Creating Website Published by Mas Template
Proudly powered by Blogger